Northwestern Lock Page 2
Table of Contents
Door Handing
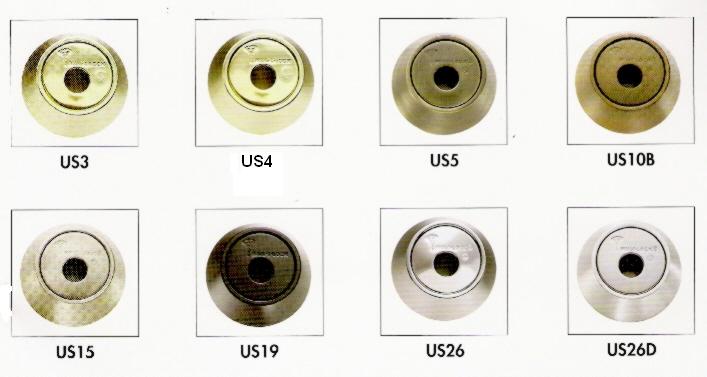
Finishes Chart
How to Dial a Safe Lock
How to Change a Kaba Simplex Lock
Masterkeying Information
Colored Pins
Witch keys and One Way Cylinders
Door Handing
Return to table of contents
Finishes
Return to table of contents
How to dial a safe lock.
We get a lot of calls from clients who have the correct safe combination, but just cannot get the thing to open. To save you a call, here is the method to open a safe lock which would be set to say a combination like "50 - 25 - 50" substitute your own numbers for these.
Return to table of contents
How to Change a Simplex 1000 - 3000 - 5000 - 7000 - 8000 Series Mechanical Combination Entry Lock
From our search strings, we know that you are looking for information on how to change these locks. I am reluctant to openly publish this because if you screw up the job, your lock will need to be serviced by an authorized Simplex dealer to get it working again. You have to follow these instructions EXACTLY or this won't work. See the diagram right for the steps which need explaining.
For the 1000 series or 3000 series -- First you need a "DF-59" key to extract the lock which is on the inside of the door. Along with the "installation tool" see the diagram for what it looks like. These should have been left with you when the lock was installed. IF you do not have either item - STOP - you cannot recombinate the lock. Call for service.
If you have both, then you are ready to proceed. First step is the lock MUST be installed on the door. Do not atempt to remove the lock - or take it apart. There are parts inside which need to be "timed" and if you get those out of time - the lock will not work. Second, the door must be open.
Changing the Simplex 5000 series Mechanical Lock
This lock changes much like the 1000/3000 series with a slightly different method. See the diagram right for the 5000 series, and again follow the steps EXACTLY or the lock will not work. The lock MUST be installed on the door.
Changing the 6000 / 7000 series Simplex Locks
The 7000 series along with the 6000 series of light duty deadbolts and nightlatch locks work the same way, except -- the access to the combination chamber is through that "cross" screwed on the inside of the door. Do not remove it or any other part of the lock while changing the lock.
These are heavy duty locks, and will work for many years without problems. Changing combinations is an exact process which needs to be followed to the letter, due to the mechanical aspect of the lock.
The Simplex E-Plex 3000, E-Plex 5000 series and all other electronic locks are not servicable for the end user unless you have been shown how to do so and have the Master Codes and been trained by the installing company to change out your combinations.
The Simplex 8000 Mortise lock is a very fussy timed lock - do not attempt to change or work on this complex lock, for if you drop ANYTHING out of time, you may damage the internal parts.
Northwestern is not responsible for your work if you try to do anything which we show or describe. These methods are straight out of the KABA SIMPLEX installation books. These should have been left with you when the locks were originally installed and you should have been shown how to do so at that time. These instructions are only for those who do not have the original materials and have the working knowledge to do so correctly. We assume no liability for your independent actions nor do we warrent anything you do to your own hardware. They are presented here for the public's information ONLY.
Return to table of contents
Masterkeying
This is a very misunderstood process. First, there is NO key out there someplace which can open any lock. This is an urban myth, which arose out of the old "skeleton key era". Today with modern 6 pin locks, there is nothing which will open a lock except the correct key.
In fact, any key can end up being a master key, which is why this job needs to be done only by a trained locksmith, or security professional. There are kits available for the end user to try to accomplish this but in the end, you will end up making a mess of it. WHY?
Because the art of Masterkeying is the controlled destruction of security. When you add "master pins" to a lock you are creating more than the intended number of keys which could in theory fit the lock. This makes "phantom keys" which are not in your system, and could unintendedly open your locks. Along with this, you need keys which are cut to factory specifications which would allow them to work without binding, or "clicks" - which means they match the specs of the cylinder being keyed.
Keys for masterkeyed systems should only be produced on "key generators" which make originals only, not duplicates. If your locksmith does not have a key machine like a Framon 2 or HPC 1200 or the equivalent, go someplace else and look for a real security professional. Depth keys will work, but you are getting keys which are in fact "duplicates", not true "originals". This will cause problems down the road if they are not true originals.
Random or "shoe box" keying really makes for a messy job. The system has to be planned out so that the number of phantom keys is reduced to the absolute minimum, and the correct cuts or bittings are set on each key blank. Filing the cylinder to make the keys work, will only make the problem of phantom keys worse, and really reduce your security.
Spend the time to work with your security professional to get what you want exactly out of your master key system, and it will be there. High security locks will reduce the problem of phantom keys almost totally. Invest in your security by having it done by a true Security Professional. Most belong to professional security organizations, like the Associated Locksmiths of America. Ask for their credentials. This is not foolproof - but it is a good step to insure yourself that the people doing the job have the training and experience to do it right.
Return to table of contents
Witch keys and One Way Cylinders
Here are two things which you can't buy from anywhere. They provide answers to problems and are made ONLY by a professional locksmith in their own shop.
On the left is a "witch key" or "lock out key". If you need to lock out a tenant, or have some other situation where there are keys outstanding and you want to lock out people - this is your answer.
Unlike keys of this type which can be had over the internet, this one doesn't have the little "tail" which sticks out. A tail sticking out invites the problem to try to use pliers to pull the keys out, and breaks it off. This now is a major problem, to remove from the broken part from lock. A properly made lock out key does not have the tail to grab. It sits flush in the cylinder, and it has a little "dog" much like a mortise and tenon to pull the insert out.
With our witch keys / lock out keys, one inserts the lower portion into the lock, and it has a small stop to keep it from going deeper. Then the problem can't insert their key into the lock. TO remove this insert, one slides the top portion in, lifts up gently, then sets it down easy, and gets the retractor to engauge, and then removes the insert. An experienced landlord can do this in an instant.
The other interesting item in this photo is a "One Way Key" or B B Binks Cylinder. These are not available to the public and need to made to order. If you look there are three keys shown. The middle key will turn both ways. The key to the right only turns to the right. The key to the left only turns to the left. Why is this important?
If you own a business, and do not lock up for the night, and need to leave a key for someone else to lock up - you don't want them coming back later and robbing you. SO you give them a key which ONLY turns in the direction of throwing the deadbolt / locking the door. Your key of course will lock and unlock the lock. This lock can also be masterkeyed so your key will work all locks in the building, and the front door / entrance key will only lock up. Of course you can also have one which only unlocks the door -- thereby showing who may have robbed you over night.
Both of these items are usually made only by a Master Locksmith, who knows how they should work. Call us if you need one. These are made to order on request only.
Return to table of contents
A major problem popped up in the past few years of discovering the bittings, or cuts of a key by the color of the pins. This is another problem with the internet.
Some outfit decided to publish the fact that by examining the pins of a lock from the outside, and from the color of the pins one could deduce the correct cuts for the key for the lock. Their explanation was that by giving out this information locks could be made "safer" and less likely to have a key cut without one's knowledge.
For as long as I have been in this industry this was not a problem. Most people didn't even know what it was all about until this point. Most locksmiths used to use a .005 kit. Lock pins are made in two sizes. .005 and .003 increments. They are all .115 in diameter, and run from a nominal .150 to .360 long. All locks have to have some tolerance in them or the keys would bind, especially when duplicates are made and not to the original exact specifications of the lock manufacturer. Therefore locks will work with a + or - .002 in cuts. Hence .005 pins would work fine for most applications due to the tolerance built in by the lock manufacturer for duplicate keys. These pins went in a regular cadance of colors which is well known to the industry. This was done for one reason.
In case the kit gets dropped or scrambled. There are about 40 to 84 holes in the kit, in which about a gross of pins of each size is kept with it's size below the hole. IF you drop or jar a pin kit the pins can and do go all over. This was to simplify the sorting out of a scrambled pin kit. We at Northwestern have dropped several over 40 years and it is a major mess to sort out the kit. One could just toss the pins and start over, but that is costly, so we take a few days to sort them out. Having colored pins makes this a bit easier, as the sizes in the same color are about .025 apart. So by sorting by color, one can pretty much check the pins with a micrometer, then match the same pins of the similar color, and the job gets done. It is time consuming.
Today we use a .003 kit, today. This kit is also color coded, but with a difference. ALL pins of one manufacturer are the same color. So say Schlage pins are all GREEN. Kwikset are either RED or PURPLE. Other lock manufacturers are similarily alike. This kit is also closer in tolerance to the actual manufacturers specifications, and thus also cuts down the amount of "slop" built into the lock, making duplicate keys harder to work. It is a trade off, but if you think you are going to examine the pins and determine the cuts by looking at the color code -- you will see something entirely different with a .003 kit, and it will not talk and give the combination away. Northwestern went to this type of kit over 20 years ago when we first became aware of the reading problem.
Original Manufactuer Pins (OEM) are one color. Either silver or gold. We use these pins for our contract work as they are twice the cost of LAB pins which are colored.
I hope this small explanation will reassure our clients that we are doing the best we can to secure their work. See our front page section on "Bump Keys" for more information.
Return to table of Contents
Thanks for using our self help page. Remember, anything you try to use off our pages, is your responsibilty. Information was correct out of manufacturers provided information, and is displayed here for your convenience.